Friday, December 30, 2011

Charmed Prints Quilt Along FINISHED!!!!

My Charmed Prints Quilt Along Quilt is Finished! Even though I came down with the flu and barely got off the couch I got it done! I BIG BIG BIG thanks goes to my mom who really helped out by sandwiching and pinning the quilt for me. I felt terrible and thanks to her I was able to use what little time I wasn't on the couch quilting instead of trying to mess with saftey pins. She is such a wonderful person!

Without further ado here it is!


I decided to make a pieced border to keep with the Pampered Pooch theme. What dogs don't love bones? Since I used this fabric line to stash bust some charm packs and a jelly roll I had, I also pieced the back.


It was alot of fun to put together and all the little pieced squares turned out super cute!!!

Tuesday, December 13, 2011

Charmed Prints Quilt Along Quilt Top

I am almost done with my Pampered Pooch Quilt for the Charmed Prints Quilt Along! I still need to add the border, but I have gotten creative and decided to piece my border and its taking longer than I thought. 


Here is the main part of the quilt top:


My hope is to have the border done and on by Friday so I can spend the weekend quilting and binding it! The deadline to post our completed quilt on Flickr to be eligible for the QAL giveaway is December 20th, which is next Tuesday, so I want to be done this weekend! (Can you believe how close we are to Christmas?!?!)


I am really happy with how well the black and red squares balanced out with the more pastel colors. I was worried they would be an eyesore or look really out of place, but it came together really nice. I think my favorite pieced feature block has to be the black and red pinwheel square on the bottom row. It really helped tie everything together! Yay!!

Monday, November 28, 2011

Charmed Prints Quilt Along- More Blocks!

I am having so much fun making these little blocks. I decided that I wanted to do 3 of each design instead of just 1.  So after I made my two blocks last week I got to work on making more. I got two more Diamond in a Square Blocks and two Star Blocks finished.


I am going to be making more blocks with the red and blue colorway. I like how it looks, but it is so different from the rest of the colors in this line. I'm hoping it all comes together at the end.


These star blocks are not as wonky as they look. I couldn't get them to lay flat!  I still have two more Pinwheel and Greek Cross blocks to make. It was also pointed out that by flipping the half square triangle blocks in the Greek Cross you can make Churn Dash. I plan on making three of those as well. 

Make sure you hope on over to the Gen X Quilter's blog. She posted a really helpful and informative review of the Electric Quilt 7 program and you can enter to win your very own copy! Go HERE to read her review and how to enter. Entries for the giveaway close on Saturday, December 3, 2011 at midnight. 

Saturday, November 26, 2011

Charmed Prints Quilt Along- Pinwheel/Right and Left Block

The second (and last) feature block of the QAL is a Pinwheel. It is also called a Left and Right Block. I was really excited about this one. I had never heard or seen this block before. I really like it and I am happy to have learned something new to use on my quilting adventures.


I had a little trouble with the block at first because I sewed two of my triangle sets backwards. Whoops! It was an easy fix and, mistake aside, this block is super simple to do. I love how it looks. I foresee this block coming into play in some quilts in my future.

I also have fabric cut to do some more feature squares. We start assembling the quilt top soon so I need to get on making the other squares ASAP! Hopefully I'll have them done before Tuesday when the next step is posted over at Generation X Quilters.

Tuesday, November 22, 2011

Charmed Prints Quilt Along- Diamond in the Square Block

Our first block for this week was a simple Diamond in the Square Block. I love blocks like these. Easy to put together-but an endless stream of possibilites! I think this block is great for showing off favorite feature fabrics or designs.

Since I am using Moda's Pampered Pooch fabric line I have been calling my quilt "Pampered Pooch" (I know original right?!?) We have a two year old lab mix and he is pampered to the max! In fact he is so pampered, spoiled and loved that I decided he needed to be in the quilt too so I found a way to include him!


Embroidery Library had an embroidery design that looks JUST like our doggie! I embroidered it on my fabric and used one of my favorite Pampered Pooch prints.  I am really happy with how it looks. I can't get over how much it looks exactly like his face!

Sunday, November 20, 2011

Charmed Prints Quilt Along- Star Block

I finally decided on the fabric to use to make my second Charmed Prints QAL block. It is a Star Block. I wanted to make sure I introduced red into some of the blocks so it wouldn't look odd to use the red charms in the fabric line when everything else was softer colored. Luckily some of the blue charms had some red accents.


The bottom part kept popping up every time I layed it on the counter. It isn't as wonky as it looks. Can't wait to see what the next feature blocks are!

I am having alot of fun making these little blocks. I think I may make a few more to sprinkle in my quilt.

Thursday, November 17, 2011

Charmed Prints Quilt Along


I joined Gen X Quilters Charmed Prints Quilt Along. It is my first one and I am excited! I have been hoarding, er, safely keeping two Pampered Pooch by Moda charm packs and a jelly roll. I'm using those plus some other charms and scraps I have, but mainly Pampered Pooch. You can make either a child size (36 charms) or a lap quilt (81 charms). I'm going to do the child size. The quilt design keeps alot of the charm squares whole, but there are fun feature blocks tossed in and the design is really customizable. If you want to join in on the quilting fun go HERE.

This week we had the first two feature blocks to do. The first one is the Greek Cross. Here is mine.


I'm hoping to get the second one done tomorrow. It is a star block. I just couldn't decide on what charms I wanted to use. I'm going to sleep on it and make my decision in the morning.  If I stay on track with the schedule I'll have a finish quilt by December 13th!

Tuesday, October 18, 2011

Simple Halloween Wall Hanging


I made a simple Halloween wall hanging for my sister. I used Fairy Frost in a cream color for the background so it would have just a little shimmer.  The fabric is so pretty in person and I my picture doesn't do it any justice! The binding fabric is a scrap of black with gold stars. I was lucky and had enough of it to bind it and use it for the backing. 

I didn't miter the corners when I did the binding. I put on the two sides first and then cut the binding to be level with the top and bottom. For the top and bottom I cut two pieces of binding and then hemmed the raw edges under. That way when I sewed it on I could slide in ribbon to use as a hanger. Since the ribbon goes through the binding and is tied when it hangs it tends to make the top corners "curl" into the middle. A wooden kitchen skewer cut just a little smaller then the finished edge and slid into the binding give the piece stability and weight so the ribbon doesn't pull the edges. (That was my fun tip of the day! ;) )

I made this for my sister who doesn't do much Halloween decorating and has a small apartment. A little something to hang on the wall.  The design, which came from Embroidery Library, is so her as well. She loved it.


Wednesday, October 12, 2011

Milk Money Bag

One of my friends recently introduced me to Embroidery Library.  I quickly fell in love with alot of their designs and what good deals you can get. I've since become addicted to their site and have put my machine through its paces doing machine embroidery.

Every Tuesday my Mom picks up fresh raw milk from a dairy farm in South Carolina for herself, me and some family friends. While cruising through Embroidery Library I found a vintage milk sign that made me think of my Mom's milk trips. Since everyone gives her money to pay for the milk I thought it would be nice to create a little something for her to put it in- a zippered pouch. First zippered pouch I ever made! I think it turned out great!


The front of the pouch. The back is the same fabric, but no design.


The inside lining of the pouch.


I followed the lined zippered pouch tutorial by Skip to My Lou. It was easy to follow, although it took me a minute to make sure I was sewing the "zipper sandwiches" correctly.

I did make a change to the directions. I wanted it to be stiffer, but didn't have any interfacing. Since I had used an iron on stabilizer when I embroidered it, I left that on and ironed a piece onto the back fabric. Then I used fusible webbing to fuse a piece of warm and natural cotton batting to the stabilizer. I fused it since I didn't want to quilt it. Next time I think I will quilt the fabric and cotton batting first then do my embroidery design. I left the lining as it is. It turned out great. It is still soft, but stands up better in a purse.

This is a great project. So quick! After the machine did its thing embroidering it took me about under 30 minutes to put together.

p.s. The Quilting Cats were banned from the room during this project, which is why it probably went so quickly. Mr. Helpful decided that he couldn't live without laying on the ironing board and kept jumping on it no matter how many times I put him back on the floor. Normally this wouldn't have been a thrown out of the room offense but the iron was on and hot and he would NOT leave it alone! So he and the other one sat outside the door and reminded me of their displeasure by howling and pawing at the door, which they eventually got open, but by then the project was complete.

Tuesday, August 23, 2011

Remember these?  The pink, purple and cat blocks that I put together for a quilt for Margaret's Hope Chest. Well she has finished combining them with the other blocks that were sent in. You can see the quilt top HERE.  I think it looks great so far and can't wait to see it quilted!  It feels good to know that scrap fabric I had laying around was used for a good cause and will brighten someone's day!

Tuesday, August 2, 2011

The Quilting Cats In Action

One of my good friends, JS, and I found a great deal on a papasan chair at a yard sale. $8.00 for the frame and two cushions. SOLD! We cleaned up both cushions real nice and I made covers for them.

One was snuggly fleece that we used to cover the worst of the two cushions. It became a dog bed for her huge doggie and he loves it.  The other one was fun brown and cream zebra print minkee with a brown pasiley minkee backing. We have a mutual friend who was going nuts trying to find a good deal on a papasan chair and we thought we would surprise her. I made the cushion while JS and her family spruced up the frame.  It turned out great! Unfortunately I don't have a picture of the dog bed or the finished papasan chair, but I will soon!

The real reason for this post is to share my quilting cats in action and show you how...adventourus...quilting can be for me.

I was putting binding on the raw edges of the minkee cushion and it wasn't going well. For some reason it seemed like my sewing machine was trying to go faster then the binding was moving. It felt like it kept getting stuck. After taking out a few stitches, cleaning, oiling and re-threading both the machine and bobbin I found the culprit! It was.... (que dramatic suspense music!) None other than Quilting Cat #1 who was trying his best to help....or hinder...not sure yet...


Don't you love his innocent "Who Me?" face? And as always Quilting Cat #2 was right there, now on her new high cat tower, giving me directions and pointing out what I was doing wrong.


In this shot she is watching Mr. "Helpful" chase around a bobbin I dropped.  She bosses everyone around.  I have also discovered that ever since I was given this cat tower I have to be careful when I sew. When I sit at my machine my back is to the cat tower and more then once I have felt something hit my ponytail (which she can reach if she sits on the level where that little blanket is) and swipe at it. but when I turn around she either is on another level or is "sleeping." She is a crafty one... Quilting with these cats is a real adventure sometimes!

Friday, July 29, 2011

Quilt Blocks For A Good Cause

Sorry that I have been so slcak about posting. It seems that once I had the time to really get down and focus on quilting and made the decision to start a blog life decided to become crazy so my craft time (a.k.a. "Me Time") became limited.  I have managed to do a few things for myself. Mainly cutting out applique shapes or cross stitching simply becuase I can do those things on my lunch break. I close the door, eat my lunch and spend the rest of the time focusing on something other than work, life, chores, etc. Plus it has been helping me be better at bringing my lunch and not wasting gas driving around. Besides it is hot in Georgia during the day!!

The few times that I have had to get behind my machine I have spent working on blocks for a quilt for Margaret's Hope Chest. I found out about them through another blog and went to their blog/site to check them out and see what they were about. And there I saw it. It was like it was there just for me. Blocks needed for a girl's quilt. She had three requests: Purple, pink and...cats. 

Long ago I had started on a quest to make a big lounge around type quilt out of cat fabric. Nothing fancy-just a bunch of 4.5" squares sewn together but each one would be a different cat fabric. So as you can imagine I managed to fill my fabric space with cat fabric. Lots and lots of cat fabric.  Since most of it was fat quarters and yardage and all I needed was a 4.5" square you can imagine the amount of left over. I've slowly been giving it away/selling precut squares of it, but this quilt was just perfect.

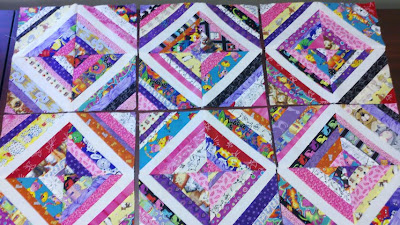
Instead of just doing the 2 blocks they ask for I went ahead and volunteered to do as many blocks as they still needed, which ended up being six. The pattern was PS I Quilt's Block O'Strings Block Tutorial.  It was really fun and I loved the results. I plan to do this with some other fabrics that I have, but didn't know what to do. 


It felt good to finally be able to do some sewing and even better to do it for a good cause. 

Sunday, June 19, 2011

Finally some time!

Sorry it has been so long since my last post. I have been crazy busy lately, but not the "wow I can't believe I have done so much sewing lately" kinda busy. The bad no sewing involved busy. Luckily I finally got some time to squeeze some sewing machine time in. Nothing major. I made a gift bag for one of my friends.


The green cat bag is the test bag I made. I didn't have a pattern so I just winged it.  It turned out really cute! The green bag is a print by Michael Miller with a matching coordinate (brown with the same colored green pawprints) for the handle and inside. The bag I made for my friend has the same fabric for all the pieces. It turned out to be a really simple project and I was VERY happy with the results! I was giving her a cross stitch kit (and some matching supplies) and couldn't find a cute bag to put the items in. I was trying to repay some of her kindness for giving me this-


Yup! That is a HUGE cat tower. She and her husband made it, but no longer had cats to use it. She passed it on to me! It is between my cutting table and the rack I use to hold my iron, embrodery unit and interfacing/fusible webbing rolls. You can kinda see a corner of my sewing table and part of the peg board on my wall that I hang all my rulers and cutting supplies on.

The cats are loving it. The bossy one...I mean the calico one has taken to sleeping on the very top. I think she likes being up there because she can see the whole room and meow (a.k.a. give her thoughts and critiques) without having to move to where I am.  I thought that having it would help keep the cats out of the stuff while I sew, but the big white one still tries to climb in my lap and sit on my machine while I work.

I also got my Gen X Japanese Fabric Swap fabric in! Lots and lots of cute charms squares. Not sure what I am going to do with them yet. I wanted to make them into a fun quilt to use this summer, but then realized I picked up two other charms fabric packs to to the same thing! HaHa! If you click on the link it will take you to the Gen X blog. She put up much better pictures (and some close ups) of the fabric.


Hopefully, I will be able to get  back into the sewing room to work on some quilts this week. I started a new cross stitch, but I only plan to work on that for a little each night before going to bed.  I can't wait to get sewing again!

Wednesday, May 11, 2011

Mail Call!

I got another package in the mail yesterday! This time it was the fabric I ordered from Connecting Threads.  When I got out the fabrics for the first block of My Cat's Garden (MCG) I noticed I didn't have any purple batik fabric for the flowers. Connecting Threads had a bunch of great batiks on sale so I picked up a couple to use in the MCG Quilt.


The colors in the picture are actually really close, but boy do these fabrics look great in person! The four up front are my favorite!  All of the batiks (except the cream ones I got for backgrounds) are bright and vibrant! Just what I needed! 

I also picked up a charm sampler pack of Connecting Threads "Bright Quilter's Candy" line. Just for fun. I think I'm going to toss the charms with some bright Kona solids or maybe just white and make a summer picnic quilt! The charm sampler pack was only $2.67 and the colors are brighter then they look in the picture...


This was the first time I have ordered from Connecting Threads and I know I will be ordering again! Main reasons I love them: 1) So many stores make you buy at least 1/2 yard when you order online. At Connecting Threads you can buy 1/4 and then choose if you want that as an actual 1/4 yard or a fat quarter.  2) They sell sampler packs of most of the lines they carry. Some samplers are 2" strips, charm squares or layer cake sized. All very reasonably priced. 3) The shipping was fast. 4) And probably what I loved the most was that they LABELED the fabrics. I hate when I order fabric that is kinda similar to each other and then have to figure out what is what. You can't see them in the photo of the batiks, but everyone is labeled with the line and color. I LOVE LOVE LOVE that! 


Now that I have all this great fabric I just need the time to sew! I haven't been able to for about a week and a half now and my fingers are just itching to turn that sewing machine on!

Sunday, May 8, 2011

Two For One

I love getting packages in the mail! So much more fun then bills. This weekend I got the fabric I ordered for the Gen X Japanese Fabric Swap.


The selvage says its "Happy Sweet Collection" by Kei Fabric (made in Japan).  My plan for tonight was just to cut the yard into 5" strips. I did and then decided just to go ahead and cut them into charms. So now I have my 56 charms to send in.


I'm pretty excited. This will be the first swap that I have participated in and its also my first experience with Japanese Import Fabrics! I have seen lots of great quilts made with Japanese fabrics, but they are pricey. When I saw this swap I thought it would be the perfect way to try two new things at the same time! Hooray for new experiences!

Friday, April 29, 2011

Beginning...

And so the adventure begins! After years of staring at the patterns, collecting fabrics, and then being too overwhelmed to start, I am finally taking the plunge and beginning to put together "My Cat's Garden" by Maggie Walker Designs. 


The fabrics in the picture are for the cat and the background. I went through my whole box of batiks before I realized I didn't have any purple ones for the flowers. This first block has about 86 pieces, but I'm ready!

I owe a BIG thanks to Robin from Crafty Musings.  She has done this quilt and it is stunning! I saw it on her blog. She gave me some great advice and now I feel ready to start! Thanks Robin!!!


Tuesday, April 26, 2011

My First Post Ever!!

Hi everyone! This is my first post for my first blog. I'm excited and nervous all at the same time! I haven't quite figured this whole Blogger thing out yet so please bare with me as I learn what the heck I'm doing.  I recently stumbled upon the world of quilting blogs and what can I say? I was hooked the minute I made that first mouse click! I have loved reading and admiring the quilts and projects the authors of the blogs I follow create and want to join in on the fun! So welcome to The Quilting Cats!

I have two cats who run the roost so to speak when it comes to my quilting time.  One can't seem to grasp the idea that what I am doing is more important then him at the time and therefore is involved in every aspect of quilting. Here he is trying to help me stipple a quilt. This quilt took forever to quilt since I had to stop to keep removing his helpful self.


The other kitty is more of the supervisor. She has a certain spot in the room that is hers and she watches. Most of the time while she is doing that she's meowing directions or criticism in my direction. After I finally finished the quilt above she had some words to say about it. I like to think they were good! She likes to talk. She was even talking while I was trying to take her picture. I think she said "Make sure to get my good side!"


And since I showed you the cats that helped it come together here is what the finished quilt looks like...

The leopard print fabric on the top, the backing and binding are all Bernatex minkee. This was a kit I have had for FOREVER. I'm glad I got it done. It is the perfect nap/cuddle quilt for the couch. It was fun to do, although I am still cleaning up minkee fuzz!!

Well that is it. First post of my first blog is officially done! YAY!! I hope you enjoy my blog!